Lampworking Tools

Close up of the shaping tools I keep in my lampworking hood. Yes, I use lots of pokers and mashers! (Note my beautiful patchwork wood desk!)
The most basic tools necessary to make a glass bead are glass and a flame source. But because glass must be kept molten hot to manipulate it, we need special tools that can withstand the heat of the flame in order to shape and form glass as desired.
Often, tools are made of metal or graphite, since both of these materials can withstand the high temperatures in a torch flame. Graphite is unique because it does not stick to molten glass, so many marvers and pokers are made of graphite. Steel, tungsten, and brass are commonly used metals.
Required Tools
Torch/Bench burner - this is a fixed torch that creates the flame. Torches can be fueled by MAPP gas, or a mixture of propane and oxygen. (rarely, natural gas and oxygen is also used). I work on a GTT Lynx, but I previously started on a Hothead. I encourage beginners to start on a Hothead to make sure they like lampworking before diving into the more expensive options.
Fuel - the easiest fuel source is to get a Hothead torch that can run on small cans of MAPP gas or propane gas
(buy this at Home depot or equivalent store); a hotter fuel source is propane/oxygen. I have a small BBQ tank
of propane that lasts for several months of beading. Oxygen is used more rapidly, and rather than deal with the hassle of having large unwieldy oxygen tanks in my studio, I choose to purchase an oxygen concentrator which can purify oxygen directly from room air. An oxygen concentrator is a few hundred dollar cost, but will save money in the long run if you intend to bead for years to come.
Mandrels - basically a long metal rod that forms the "hole" of the bead. Glass is wound completely around the rod, and when the rod is removed after the bead is annealed, a hole going completely through the glass remains. Mandrels are also important so you can hold onto the bead without getting your hands too close to the flame.
Bead release - a clay like coating on the mandrel applied prior to winding glass around it. Bead release aids in removal of glass off of the metal mandrel. Without bead release (or with a crappy bead release) you end up with glass permanently stuck to the metal rod.
Glass - lampwork glass is usually sold in rods about 8mm in diameter. (Fusing glass that comes in flat sheets can also be used if you cut them into strips, but be careful of sharp edges!) Rods are just easier to manipulate and use for small scale lampworking.
I recommend Effetre glass (COE 104) for beginners since it is relatively economical and comes in a wide variety of colors.
I do not recommend using bottle glass or window glass or any other "found glass" if you are just beginning. They tend to be "shocky," meaning they are prone to thermal shock when glass is first introduced into the flame, and are generally difficult to use. But found glass can be an interesting and fun to experiment with as you gain experience. However, you cannot mix glass from different bottles, even from the same manufacturer as different lots may have different COEs.
- Fiber blanket, Vermiculite, Annealing Bubbles, or Kiln - Kilns are expensive (mine cost $745), but they are the best option. For those starting out, you can use a low cost alternative (fiber blanket or annealing bubbles). These are all methods to slow cool your glass beads back to room temperature. Kilns are the best because they slow cool the slowest and are infinitely programmable.
Kilns are used to anneal your glass pieces after they are produced. This means that a kiln will ramp the glass back to room temperature slowly to avoid thermal shock. The annealing process is required to relieve thermal stress and make glass more stable. Any glass you intend to sell or give to others should be kiln annealed to avoid eventual breakage.
Optional Tools
Kiln - I would consider a kiln to be practically required, unless you are a very new beginner, just testing the waters. If you find yourself getting frustrated losing your beautiful beads to thermal shock as I was, consider saving up for a good kiln.
Marver - A marver is a basically a flat piece of usually graphite material that you can use to shape your beads on. The marver draws heat out of the bead, so this can create interesting effects on special glass that have striking properties (change colors on heating and cooling). There are two basic types of marvers - a torch mounted marver that is fixed on top of your torch (this is nice to have to keep some smaller glass pieces like murrini warm) and a hand held marver, usually a block of graphite on a handle, useful for manipulating glass by hand.
Picks - usually either straight or with a 90 degree bend at the tip. These are useful in raking glass, poking bubbles into glass, or otherwise fine manipulations of molten glass. Do not use your tools directly in the flame, this will damage them over time.
Tweezers - useful for picking up small pieces of glass, removing amounts of glass from a hot bead, applying murrini or metal foil, etc.
Shapers, molds, and presses - These are all tools that will help you shape your glass to the desired form. You can purchase them in many shapes and sizes. They are nice if you have to make a set of consistently sized beads (for a bracelet or necklace set for example). However, do not rely too much on shapers and molds. In my opinion, you should be able to consistently make nice donut round beads without the help of any tools before you take the step to buy manufactured shapers.
Frit trays, glass shears, hot fingers, marble molds, bead reamers, bead coring machines...
There are an endless amount of additional tools you can buy for your lampworking hobby! Please take the time to really learn the skills with the minimal amount of tools first before delving into everything else.
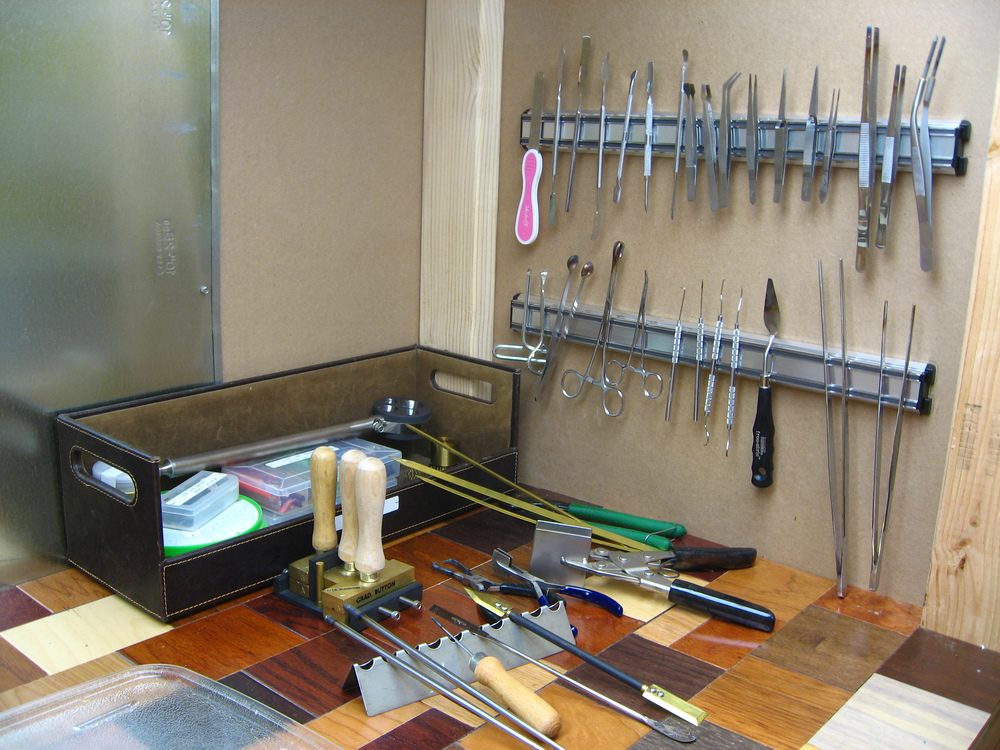
I have two magnetic strips installed on the side of my hood for holding even more tools! Tweezers and pokers are a necessity! There are lots of tools that I've re-purposed for lampwork use (pink nail file, painting spatula, dental tools, etc)
I hope you found this review of Lampworking Tools helpful. What tools have you found to be indispensable in your lampworking routines? Any tools you think I should add to the required and optional lists? Please feel free to comment!